Sunday, December 13, 2009

Getting Closer


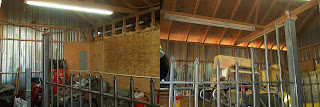
To the end of this project that is. Matt and I worked on Jerome's fence again yesterday. We are nearing the end of fabrication with just a few finishing touches left, hopefully we will be able to knock those out and start painting the fence soon. Once the paint dries we will be ready to install. This is a shot of the post caps that are on top of every post save the two gate posts. and this is Matt mugging for the camera( he hates those safety glasses). Click for a better look.

Thursday, December 3, 2009

Pewter


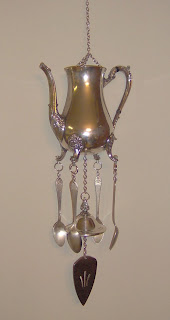
Another wind chime! This piece was commissioned by a friend, and all the parts are from his own collection. The tea pot is pewter and is a design that I haven't run across yet. The chime is the top of a pewter sugar bowl, it has an interesting onion shaped knob on top. All four spoons are also pewter. Three of the four spoons are are from places that he visited in his life and the fourth one was a spoon from a set of pewter dishes that his grandson used as a baby. Please click on the image for a better look.

Friday, November 20, 2009

Day 2

Here we go again. In the first two photos, the second half of this section is ready for pickets, so we start cutting pickets. In the next two shots all the pickets have been cut and debured, now we can install them and weld them in place. In the last two pictures we stand the fence up and install the post caps, then we can stand back and see how it looks, and see if there are any corrections or alterations that we want to make. Click the pics for a better look.

Sunday, November 15, 2009

Jerome's Fence

The project has commenced! Here are a couple of pictures of bundled materials. The pic on the left is the pickets that Jerome picked out and on the right is the punched c-channel that the pickets will slide through. The next couple of pictures are of Matt and I cutting three inch square tubing into fence posts. In these last two pictures you will see that the c-channel is welded to the posts and that the holes are awaiting their pickets , then we have a shot of the pickets and post caps installed and welded in place. This panel is sixteen feet long and is one of four panels that we are going to build. Two of the panels are going to bolt together to make the thirty two foot run that starts at the corner and runs up to the walkway, another panel will run between the walkway and the driveway, and the panel that you see in the picture is going to run from the driveway to the property line. Please click on the pictures for a closer look.

Thursday, October 29, 2009

Skeet Thrower


This is a skeet thrower welded to a chair. No its not ornate but it is fun and it wont jump off the ground anymore !!!!

Tuesday, October 13, 2009

New Project

Wow has it been a month? I'm sorry! Anyway, Ive been given the green light on a project that has been in the works for a while now. Several months ago The Honorable Mayor Jerome Scott of Pollock Louisiana approached me to discuss commissioning an ornamental iron fence to run along the front of his beautiful home . I worked up a bid and he accepted it with the stipulation that the roofing contractor and the siding contractor needed to finish their work first(because the fence would deny them access to the house). The contractors are finally getting finished and within the next couple of days I will be ordering the metal I need to fabricate the fence. There will be plenty of pictures to post in the next couple of weeks so stay tuned !!!


Update
Here is a picture of Jerome's house. This was taken about a month ago, the roof is finished now. I ordered the steel it should arrive in a couple of days. I will keep posting as it progresses.

Thursday, September 17, 2009

Trivet


Today I started playing with this trivet and I decided to use half of it to make a flat wind chime. Its hard to see but I used a butter knife as the clanger and the wind catcher is the top to a small covered dish if you look closely you will see a notch on the sea shell. I believe that the notch was to allow a spoon to be left in the dish while the dish was closed. You can click on the image for a larger view

Wednesday, September 16, 2009

Random Parts


Today I have a chime that is an odd collection of parts. The top is a bowl although I'm not sure what it would hold, the clanger is a silver dish that I modified and the wind catcher is a candy dish. All the pieces are silver but they don't really match. I like the way that it looks however and it does have an interesting chime. Please click on the photo for a larger view.

Tuesday, September 15, 2009

Small Teapot


Hello everyone. Today I made a chime from a small teapot , note the size of the teapot in comparison to the pickle forks. This teapot might hold one cup of liquid. The wind catcher is the bottom of a candle stick. It never ceases to amaze me that you can find a seemingly endless amount of cool stuff if you are willing to dig a little. Click the photo for a larger view.

Friday, September 11, 2009

Mini Chime


Hey folks. Today I have for your inspection a mini chime. I know that it is hard to judge scale in this photograph but if you will look at the wind catcher at the bottom of the chime you will notice that it is a teaspoon. Now I will direct your attention to the small spoons that ring against the lid of this tiny sugar bowl . I am at a loss as to what these little spoons are for, perhaps you could use them to get olives out of the jar without getting any juice. I just don't know, but they are interesting and they make a nice sound . Please click on the picture for a larger view.

Thursday, September 10, 2009

Sugar Bowl Chime


Hey everyone, sorry its been a few days. I've been waiting for some more chain. I ordered some chain from an outfit in Ohio and it never came in so I started looking around and found some locally, and it was cheaper than the online store (go figure) . This chime is made from a sugar bowl with a small plate about the size of a coaster to catch the wind . Click on the image to see a larger view

Sunday, August 23, 2009

Wind Chime


Hi there again, here is a new wind chime Ive come up with. This one has a top made from a filigree tray and butter knives clanging against a candle holder with a spatula to catch the wind. I have acquired a bunch of silver pieces and I am awaiting a package full of more chain so there will be more shortly . See ya soon. Click on the image for a larger view.

Thursday, August 20, 2009

Wind Chime 1.5

Hello again. This wind chime was commissioned by the owner of the first one and is intended to be a gift to a sister. Both were crafted from some silverware that has been in the family for years , now you know why they look similar . The main difference between the two is the first was made with four pickle forks and this one has two forks and two tea spoons . The pitchers do have a few differences but the floral pattern is the same. Feel free to click for a larger view.

Thursday, August 13, 2009

Large Wind Chime


Hey folks here is a picture of my second wind chime. This tea pot is old and the silver has a beautiful patina. The spoons make a great ring when they clang against the lid. I am very pleased with the way it turned out. Ive got some more ideas and I'm sure there will be more to come. now its off to search the flea markets and garage sales for more pieces. Click on the picture for a larger view.

Monday, August 10, 2009

Wind Chime

Hi guys this is a wind chime that was made from some assorted silver ware. The silver has a beautiful chime . For a first try it turned out nice (of course the pieces I used gave the final product its
elegance ) . I am working on a couple of others . Ill be posting some more in the next couple of days as the other wind chimes come together. As with the other entries here you can click on the pictures to get an enlarged view.

Thursday, July 30, 2009

Deer Stand


Hi there again! I know its been a while but here is another project that Ive been working on. Originally this was a tripod stand that blew over and was damaged. We took what metal we could salvage from the old stand and added some new metal and built a base for a box stand. I know what your thinking," its not very tall", four feet to be exact but its going to sit on a pipe line overlooking a creek bottom so it will work perfectly. There is going to be a plywood box on top but all that I was tasked with doing was building the base.

Monday, March 23, 2009

Insert Installed

We had a little hiccup installing this one. We decided to use some lag bolts with decorative heads, and when we tightened down the last bolt the head popped off! Thank goodness that I had one spare. I had to run back to the shop for it and a pair of vice grips to remove the shank of the broken bolt from the door, and then carefully install the new one. I like the way that it looks behind the glass . What do ya think?

Sunday, February 22, 2009

Door Insert


I know it's been a while but I'm back. Here are a few pics of a project Matt and I are working on. The customer wants an insert for the front door of their house. It is going to be mounted to the door behind a large pane of glass. I will post more as we make more progress.

Window Bars


Here are two pics of the ornamental iron bars that Matt and I built for my aunt. Her instrustions were that she loved fluer-de-lis and that she didnt want them to look like jailhouse bars. I think we nailed it.